Hardstuck Guide: https://hardstuck.gg/gw2/guides/end-of-dragons/old-lions-court-cm
OLC CM has the same mechanics as the original Old Lions Court
Encounter Walkthrough
There are only two mechanical changes in CM:
- Empowered, 5% outgoing damage buff that is applied to a watchknight whenever someone fails a large aoe mechanic
- 1 stack per shockwave for Dual Horizon
- 1 stack for each player in red aoe during Pernicious Vortex
- 1 stack for each player in the red ring during Crackling Wind
- Boiling Aether is now larger and never despawns
- These puddles must be placed properly, and may require stacking
Puzzle Phases
- Puzzle phases are random
- Notably, you will not CC the same watchknight more than once. the 2nd and 3rd Puzzle phase should be easier.
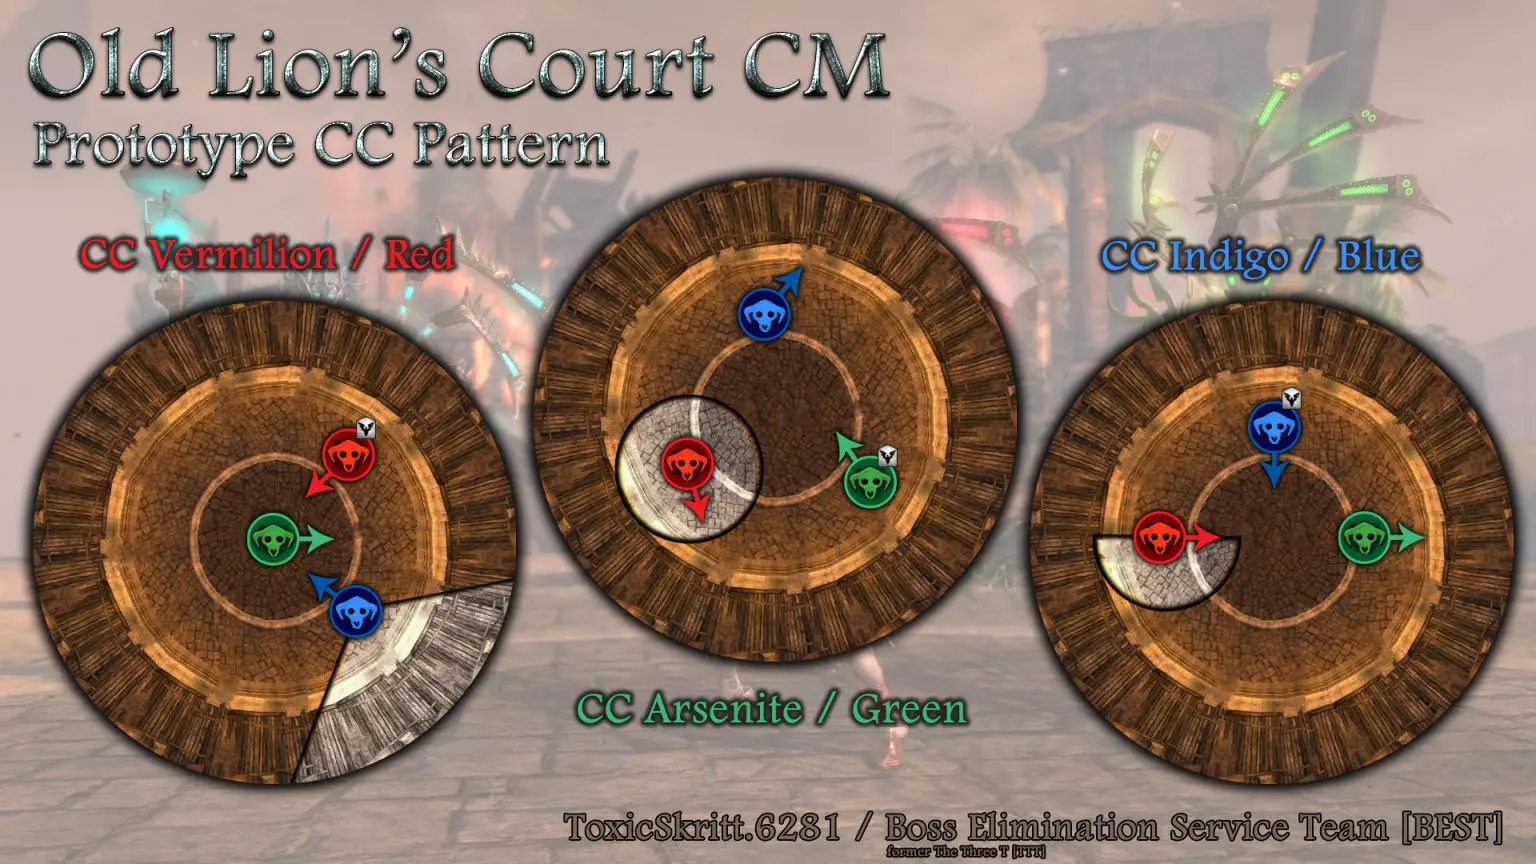
- To determine the right one to CC:
- If a Watchknight is in the middle, break Vermillion. They will also be very close!
- If the Watchknights form an equilateral triangle around the center, break Arsenite
- Otherwise, break Indigo!
Here is a handy diagram. The one you break is the one with the little defiance buff:
Phase 1 (100% - 60%)
Phase 1 here is identical to OLC Phase 2. But there are times when you’ll want to CC and times when you wont!
You’ll fight one boss at a time, but instead of their own Danger Zones, another one will drop in and do its danger zone.
- Vermillion’s tank should bring it to the edge for puddles, moving a bit when its dropped
- Arsenite’s tank should bring it to the edge, or the center. Disc muddles should be moved to the edge!
- Indigo does not move, so it is very important to move its puddles to the edge
Phase 2 (60% - 20%)
Phase 2 is the worst. Bosses will spawn in pairs.
- Vermillion & Arsenite
- Bring vermillion to the edge and keep Arsenite near the center
- Healer keep an eye on Arsenite
- Everyone should stack at Vermillion and whenever the Disc is sent to the group, Vermillion should move away while the green tether should stay to drop the puddle at the wall
- Arsenite & Indigo
- Indigo will always be center, so move Arsenite to the edge
- Make sure to deal with Tri-Bolt properly, stacking them as per the guide below
- Try to place puddles behind the group, and not in the middle
- Indigo & Vermillion
- Vermillion should be tanked by someone with survivability here.
- Vermillion must be kept at the edge of the brown tether (Power Transfer), but that will mean Indigo’s push mechanic will be dangerous, so healers must help them.
- The guide recommends that the Vermillion’s tank come in a bit during Push, even if it means having a puddle slightly further in.
Phase 3 (20% - 0%)
This phase is essentially a victory lap. Just make sure to focus on the mechanics individually, as there is no Danger Zones. Do not drop puddles on Indigo is it will make it very difficult.
Boiling Aether Stacking
Quick example: https://assets.hardstuck.gg/uploads/OLCCM-StackingBoilingAether.mp4
- Because of the larger size of the AoE’s and the fact they persist forever, means stacking them is super important.
- Guides recommend stacking them, e.g. placing them inside each other. It’s very important to note, that this can potentially kill you if not done correctly!
- During Tri-Bolt, it is super important to do it, and is quite easy. If you get the blue tether, around the end of the tether, dodge into the circles and you’ll be teleported out safely.
- Any other time, you’ll need full endurance. Dodge in at the last moment and then dodge out.
- You can use blinks too
When do I CC?
I suspect the commander will say whether to CC. But the guides suggest:
- Always invert Vermillion’s Danger Zone
- Only invert Indigo and Arsenite if there are downstate or other emergencies